How to Configure Kathara Static Routing


Introduction
A router is essential in a network because it routes packets. It enables a computer to communicate with other computers that are not on the same network or subnet. A router accesses a routing table to determine where packets should be sent. The routing table lists destination addresses. Static and dynamic configurations can both be listed on the routing table in order to get packets to their specific destination.
Static Routing is a manually configured fixed pathway that a packet must travel through to reach a destination. Static routings uses less network resources than dynamic routings because they do not constantly calculate and analyze routing updates.
It is best to use static routes when network traffic is predictable, and the network design is simple. It is not recommended to use static routes in a large environment where networks are constantly changing because static routes would not update to any network changes. When using static routes, you would need to configure the other router to have static routes as well depending on what you are trying to do.
One example where static routes can be useful would be specifying a gateway of last resort (a default router to which all unrouteable packets are sent). Another example is to facilitate communication between routers that are not able to communicate on your current network topology.
Dynamic routing is calculated by using dynamic routing algorithms. Dynamic routing protocols automatically create and update the routing table. Most networks use dynamic routes and might have at least one or two static routes configured for special cases.
Below is an example of a topology that we are going to configure static routes for. In the topology, PC1 will not be able to communicate with PC2 and vice versa until a static route is created.
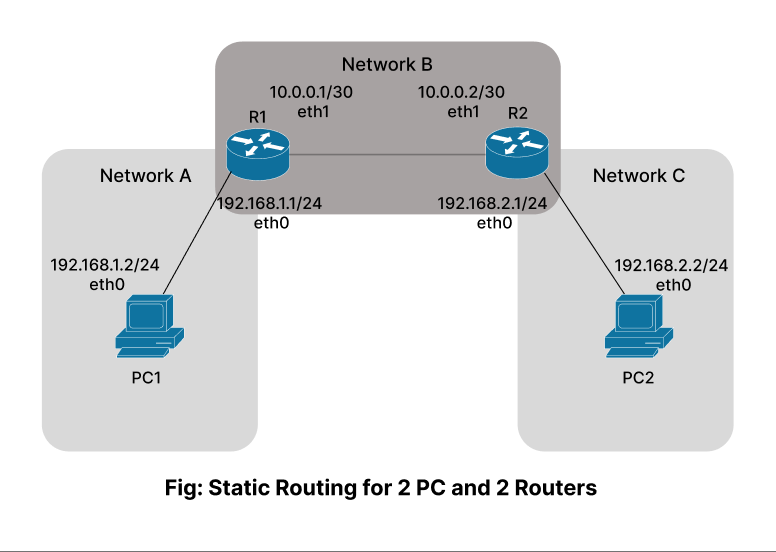
This is a network diagram that is going to be used to help demonstrate IPv4 static route. In this topology, we are using /24 as our subnet mask.
Description
This blog explains how to configure static routes using Kathara, an open-source network emulation tool.A step-by-step guide to setting up a simple network topology and configuring static routes to ensure network connectivity.
Before running the lab, ensure Kathara and Docker are installed, along with xterm for terminal emulation.
- Install Kathara
sudo add-apt-repository ppa:katharaframework/kathara
sudo apt update
sudo apt-get install kathara
- Install Docker
sudo apt install docker.io
- Install xterm
sudo apt-get update
sudo apt-get install xterm
Step 1 – Network Topology
We will set up a simple network topology with two PCs and two routers connected through different collision domains (network segments).
IP Addresses and Interfaces
pc1: 192.168.1.2/24 (eth0)r1: 192.168.1.1/24 (eth0), 10.0.0.1/30 (eth1)r2: 10.0.0.2/30 (eth1), 192.168.2.1/24 (eth0)pc2: 192.168.2.2/24 (eth0)
Step 2 – The Lab Setup
Directory Structure

Create the following files in your lab directory:
lab.confpc1.startuppc2.startupr1.startupr2.startup
Configuration Files
lab.conf
r1[0]=A
r1[1]=B
r2[0]=C
r2[1]=B
pc1[0]=A
pc2[0]=C
pc1.startup
ip address add 192.168.1.2/24 dev eth0
pc2.startup
ip address add 192.168.2.2/24 dev eth0
r1.startup
ip address add 192.168.1.1/24 dev eth0
ip address add 10.0.0.1/30 dev eth1
r2.startup
ip address add 192.168.2.1/24 dev eth0
ip address add 10.0.0.2/30 dev eth1
Starting the Lab
Navigate to the directory containing the lab.conf file and start the lab using the Kathara command:
kathara lstart


Step 3 – Testing Connectivity
Directly Connected Networks
Check connectivity within directly connected networks.
Ping frompc1 to r1
root@pc1:~$ ping 192.168.1.1
Expected result:

Ping frompc2 to r2
root@pc2:~$ ping 192.168.2.1
Expected result:

Indirectly Connected Networks
Attempt to ping networks that are not directly connected.
Ping frompc1 to r2
root@pc1:~$ ping 10.0.0.2
Expected result:

Step 4 – Adding Default Routes on PCs
To enable pc1 and pc2 to reach networks beyond their directly connected segment, add default routes.
Onpc1
root@pc1:~$ ip route add default via 192.168.1.1 dev eth0
Onpc2
root@pc2:~$ ip route add default via 192.168.2.1 dev eth0
Verify Default Routes
Check routing table onpc1
root@pc1:~$ ip route
Check routing table onpc2
root@pc2:~$ ip route
Expected result:

Step 5 – Configuring Static Routes on Routers
To ensure the routers can forward packets between pc1 and pc2, add static routes.
On r1
root@r1:~$ ip route add 192.168.2.0/24 via 10.0.0.2 dev eth1
On r2
root@r2:~$ ip route add 192.168.1.0/24 via 10.0.0.1 dev eth1
Verify Static Routes
Check routing table onr1
root@r1:~$ ip route
Expected result:

Check routing table onr2
root@r2:~$ ip route
Expected result:

Step 6 – Final Connectivity Test
Ping from pc1 to pc2
root@pc1:~$ ping 192.168.2.2
Expected result:

Ping from pc2 to pc1
root@pc2:~$ ping 192.168.1.2
Expected result:

Networking Concepts Explained
IP Addressing
Each device in a network is assigned a unique IP address. In our lab, we used private IP addresses within the ranges of 192.168.1.0/24 and 192.168.2.0/24.
Subnets
A subnet is a segmented piece of a larger network. Subnets help to organize networks efficiently. For example, 192.168.1.0/24 represents a subnet where the first 24 bits are used for network identification and the last 8 bits for host identification.
Routing
Routing is the process of selecting paths in a network along which to send network traffic. Routers use routing tables to determine the best path to forward packets.
Static Routing
Static routing involves manually adding routes to a router's routing table. This is useful in small networks or for specific static paths in larger networks. Static routes do not change unless manually altered.
Default Route
A default route is a route that a router uses when no other known route matches the destination IP address. It typically directs packets to another router that can handle them.
Conclusion
By following this guide, you should be able to configure static routes in a simple network topology using Kathara. Understanding static routing, default routes, and subnetting is crucial for managing and troubleshooting networks effectively. To stop the lab, use the command:
kathara lclean
