AWS Resource Tracking with Shell Scripting: Part-1
Optimizing Costs, Enhancing Security, and Streamlining Performance for Your AWS Infrastructure
In today's digital age, where businesses rely heavily on cloud computing services like Amazon Web Services (AWS), efficiently managing resources is paramount. Whether a startup or a large enterprise, keeping track of AWS resources is crucial for various reasons. Let's delve into why resource tracking is essential and how one can streamline this process step by step.
The Need for Resource Tracking
1. Cost Optimization
Understanding resource usage patterns helps in identifying underutilized instances or services, allowing you to optimize costs effectively. By eliminating unnecessary resources or rightsizing existing ones, you can significantly reduce your AWS bills.
2. Security and Compliance
Tracking resources aids in maintaining a secure environment by identifying unauthorized access or configurations. It ensures compliance with security standards and regulations, mitigating potential risks of data breaches or security lapses.
3. Performance Optimization
Monitoring resource performance enables you to identify bottlenecks and optimize system performance. By analyzing resource usage metrics, you can fine-tune configurations for optimal performance and scalability.
Step-by-Step Guide to Resource Tracking
1. Install AWS CLI
The AWS Command Line Interface (CLI) is a powerful tool for managing AWS services. Install it on your system by following the instructions provided in the AWS documentation: AWS CLI Installation Guide
2. Write the Tracking Script
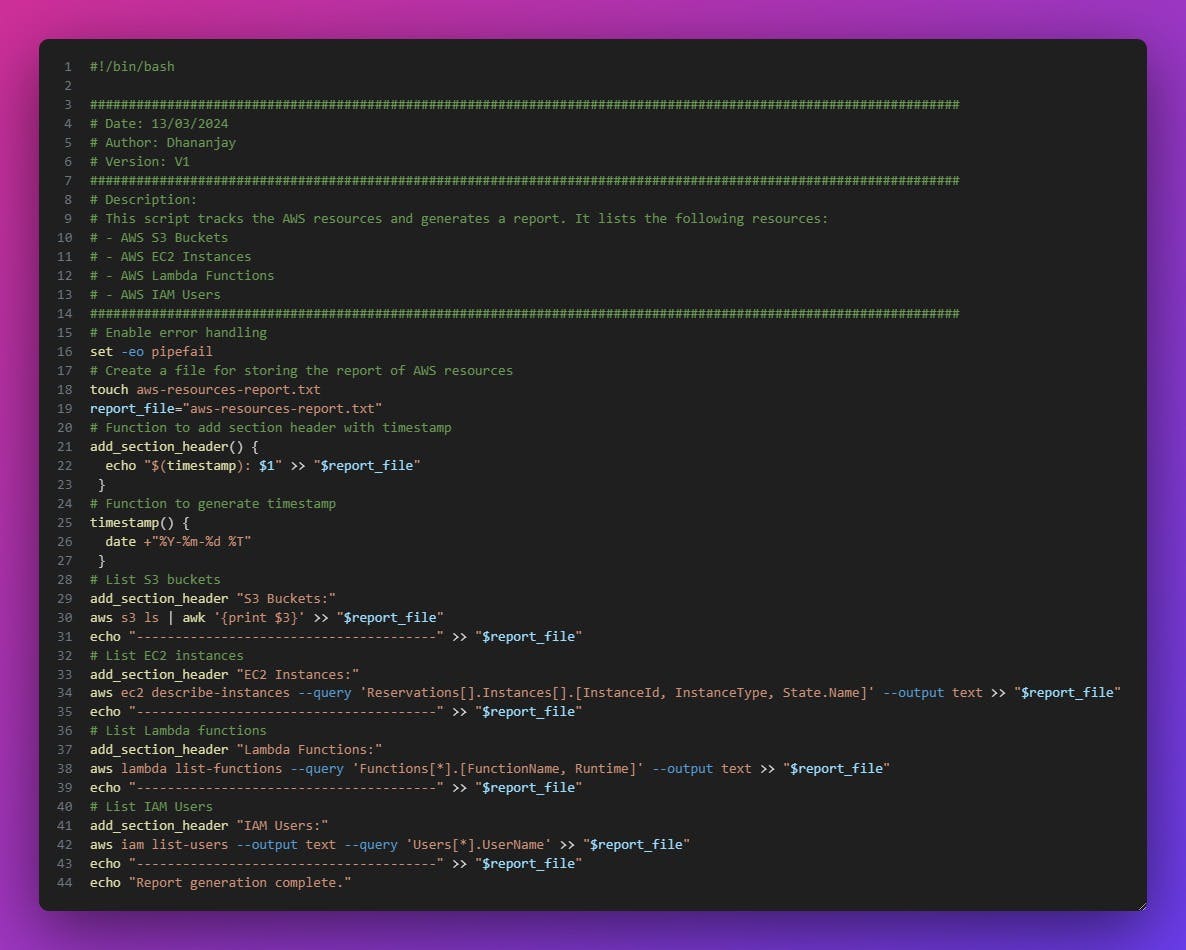
Create a script to track AWS resources such as S3 buckets, EC2 instances, Lambda functions, and IAM users. Here's a basic script to get you started:

3. Execute the Script
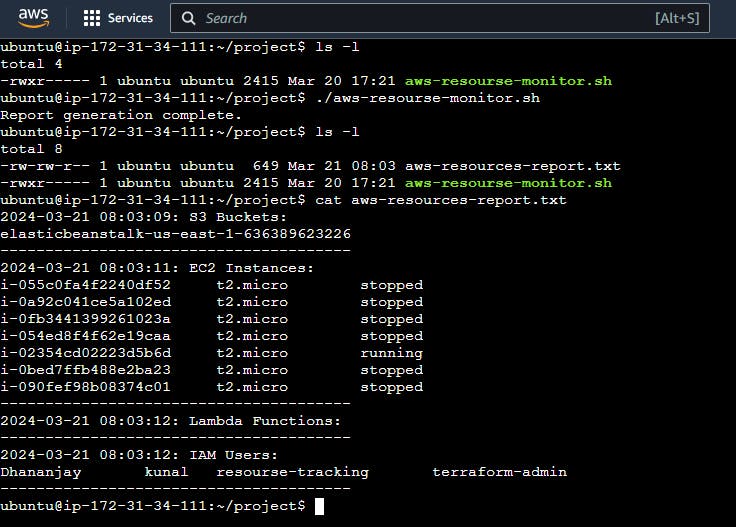
Save the script in a directory and execute it. Ensure that AWS CLI is properly configured on your system to access AWS resources. Also ensure that the user has proper permissions to run the script. After the execution, a new report file is generated in the same directory, which has all the aws resources that our account is using.

4. Schedule Script Execution with Cron
To schedule a script to run at 10:00 AM every morning using crontab, follow these steps:
Open your terminal.
Type
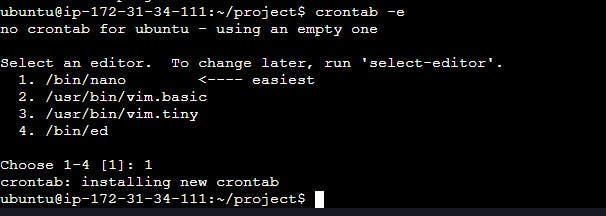
crontab -eand press Enter. This will open the crontab file for editing.
If prompted, select an editor (e.g., nano, vim).
Add the following line to the crontab file:
0 10 * * * /bin/bash /home/ubuntu/project/aws-resourse-monitor.sh
Explanation:
0 10 * * *: This sets the schedule. It means "at minute 0 past hour 10 on every day of every month and every day of the week"./bin/bash: This specifies the shell to be used for executing the script./home/ubuntu/project/aws-resourse-monitor.sh: This is the full path to your script.
- Save and exit the editor. In nano, you can do this by pressing Ctrl + X, then Y, and finally Enter.
After saving the crontab file, the script will be scheduled to run at 10:00 AM every morning. Make sure that the script /home/ubuntu/project/aws-resourse-monitor.sh has the execute permission set. You can set it using the following command if it's not already set:
chmod +x /home/ubuntu/project/aws-resourse-monitor.sh
That's it! Your cron job is now set up to run your script at 10:00 AM every morning.
Future Scope: Setting Up Email Notifications
In the next part, we'll enhance the script to automatically email the generated report to your senior or manager. Stay tuned for an email integration guide!
With these simple steps, you can efficiently track your AWS resources, optimize costs, enhance security, and streamline performance. Start implementing resource tracking today and unlock the full potential of your AWS infrastructure!
